404 errors can be very detrimental to the SEO of any website, particularly when there are internal links on the website resulting in a 404 error. A 404 error is the result of attempting to access a page on a website that doesn’t exist. These can be the result of links to deleted pages, links with additional or missing characters, or links that were incorrectly copied. In any case, a 404 error is bad for the user experience and as a result bad for SEO.
The first step to fixing 404 errors is to identify links that result in 404 errors. The easiest way to do this is via Google Analytics. If your website isn’t already setup with Google Analytics, stop what you’re doing and immediately setup Google Analytics on your website.
Setting up a custom report in Google Analytics to track internal 404 errors
Using custom reports to track internal 404 errors is quite simple. Keep in mind, this will not identify every existing link on your website that results in a 404 error, it will only identify 404 errors when they have been initiated by a website user. Identifying every broken link on your website requires a different approach, which we will discuss in a later post. For now, lets get started on tracking 404 errors with Google Analytics.
- In Google Analytics, in the left column click Customization -> Custom Reports.
- Click +New Custom Report.
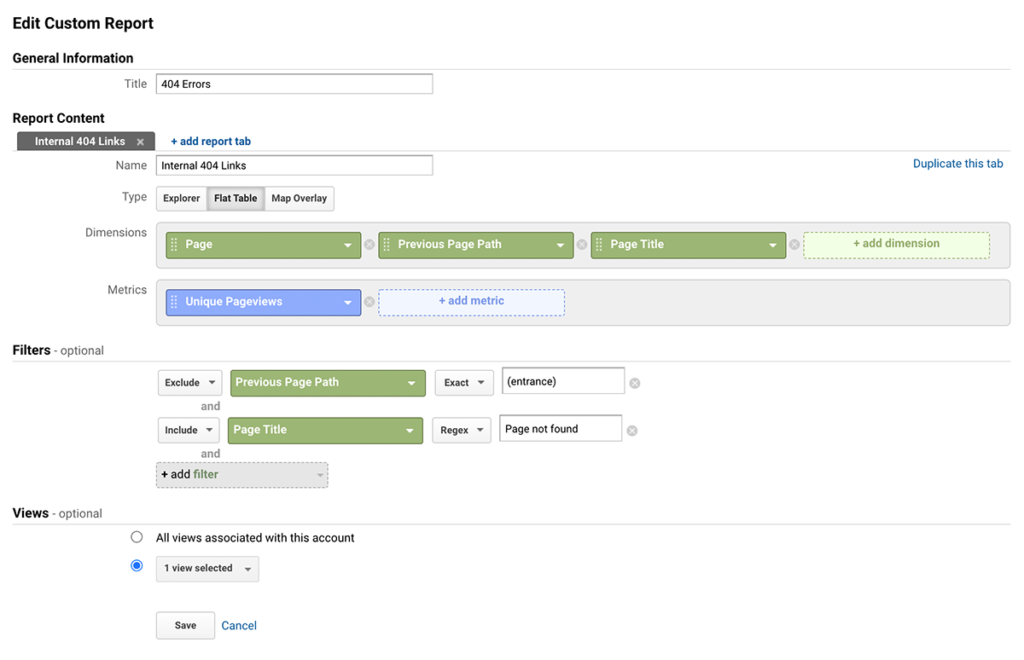
- Enter a title for the custom report and a name for tab in the report, we used “404 Errors” and “Internal 404 Links” respectively.
- For Type select Flat Table.
- Add three Dimensions; Page, Previous Page Path, and Page Title.
- Add a single metric; Unique Pageviews.
- Add two filters:
- The first filter will exclude traffic from external sources, so we are only tracking internal links that resulted in a 404 error.
- Click + add filter and enter Previous Page Path in the search field and click on that option in the dropdown.
- Select Exclude and Exact in the dropdown fields that appear.
- Type (entrance) in the text field
- The second filter will include traffic that results in a 404 error.
- Click + add filter and enter Page Title in the search field and click on that option in the dropdown.
- Select Include and Regex in the dropdown fields that appear.
- In the text field, type the page title or portion of the page title that that indicates it is a 404 error page. For our example we are using Page not found. Refer to the video below for more detail to ensure you are doing this properly.
- The first filter will exclude traffic from external sources, so we are only tracking internal links that resulted in a 404 error.
- Finally, click Save.
You should now have a custom report that will show you 404 errors that have happened on your website over the selected date range. You should refer to this regularly to ensure you don’t have a growing number of 404 errors on your website.
If you want to skip all of the work in doing this yourself, you can use the link below to our custom report setup. Note, you may need to change the page title to match the page title for your website’s 404 error page. Watching the video below will help you determine how to get your 404 error page title.
Autowebing Custom Report for Tracking Internal 404 Errors in Google Analytics